Mission
Project Name: 3-Stage Distance Detection System
01_10_distance_measurement_steps.ipynb
- Running the cell code.Ctrl + Enter
How to Excute the Python File
Set environment variables before executing a Python file.
%env DISPLAY=:0
%env PROGRAM_PATH==/root/scripts/aikit/lecture/02_REALSENSE
Check the contents of the Python file to be executed.
!cat $PROGRAM_PATH/01_10_distance_measurement_steps.py
Check the contents of the Python file to be executed.
!cat $PROGRAM_PATH/01_10_distance_measurement_steps.py
Excute the Python file.
!python3 $PROGRAM_PATH/01_10_distance_measurement_steps.py
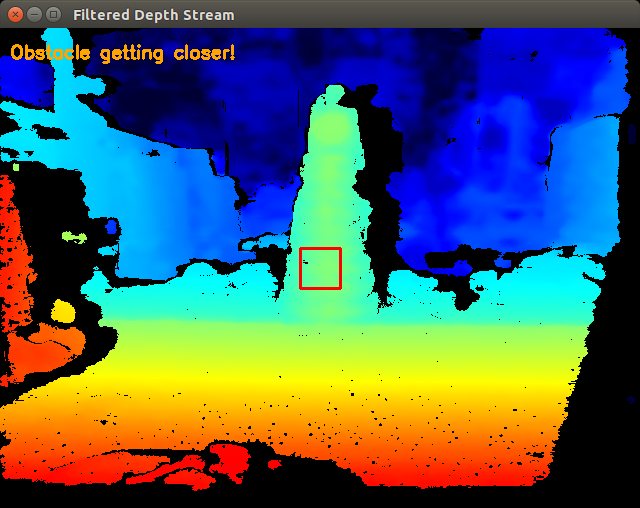
If executed correctly, the following window will appear on the Jetson Nano’s display.
Python File Description
import pyrealsense2 as rs
import cv2
import numpy as np
- These lines import necessary libraries:
pyrealsense2 is a Python library for working with RealSense depth cameras.
cv2 is OpenCV, a powerful library for computer vision tasks.
numpy is a library for numerical and array operations in Python.
DISTANCE_MINIMUM = 0.01
DISTANCE_NEAR = 0.3
DISTANCE_MEDIUM = 0.6
DISTANCE_FAR = 0.9
These are constants defining distance thresholds for obstacle detection. For example, DISTANCE_NEAR represents the distance at which an obstacle is considered “near.”
DECIMATION_MAGNITUDE = 2
SPATIAL_ALPHA = 0.5
SPATIAL_DELTA = 20
TEMPORAL_ALPHA = 0.4
TEMPORAL_DELTA = 20
These are initial values for parameters used by various filters. Filters help improve the quality of depth measurements by reducing noise.
pipeline = rs.pipeline()
config = rs.config()
config.enable_stream(rs.stream.depth, 640, 480, rs.format.z16, 30)
pipeline.start(config)
These lines set up the RealSense pipeline to capture depth frames:
pipeline manages the data flow from the RealSense camera.
config is used to configure the camera settings.
config.enable_stream specifies that we want to capture the depth stream with a resolution of 640x480 pixels, a format of z16, and a frame rate of 30 frames per second.
pipeline.start(config) starts the pipeline, which begins capturing frames from the camera.
decimation_filter = rs.decimation_filter()
spatial_filter = rs.spatial_filter()
temporal_filter = rs.temporal_filter()
These lines initialize three different filters: decimation_filter, spatial_filter, and temporal_filter. These filters will be used to process the depth data.
cv2.namedWindow("Filtered Depth Stream", cv2.WINDOW_NORMAL)
cv2.resizeWindow("Filtered Depth Stream", 640, 480)
These lines create an OpenCV window named “Filtered Depth Stream” and set its size to match the resolution of the depth frames (640x480 pixels).
while True:
This line starts an infinite loop, which will continuously process frames from the RealSense camera.
frames = pipeline.wait_for_frames()
depth_frame = frames.get_depth_frame()
Inside the loop, these lines wait for frames from the RealSense camera and extract the depth frame.
if depth_frame:
This condition checks if a valid depth frame was obtained (not None). If a valid frame is available, the following code is executed.
decimation_filter.set_option(rs.option.filter_magnitude, DECIMATION_MAGNITUDE)
spatial_filter.set_option(rs.option.filter_smooth_alpha, SPATIAL_ALPHA)
spatial_filter.set_option(rs.option.filter_smooth_delta, SPATIAL_DELTA)
temporal_filter.set_option(rs.option.filter_smooth_alpha, TEMPORAL_ALPHA)
temporal_filter.set_option(rs.option.filter_smooth_delta, TEMPORAL_DELTA)
These lines set the filter parameters based on the initial values defined earlier. The parameters determine how the depth data will be filtered.
filtered_frame = decimation_filter.process(depth_frame)
filtered_frame = spatial_filter.process(filtered_frame)
filtered_frame = temporal_filter.process(filtered_frame)
The depth frame is processed through a series of filters (decimation_filter, spatial_filter, and temporal_filter) to improve the quality of the depth data.
filtered_depth_data = np.asanyarray(filtered_frame.get_data())
The filtered depth data is converted into a format that can be used for image processing.
CENTER_X, CENTER_Y = 320, 240
center_depth = depth_frame.get_distance(CENTER_X, CENTER_Y)
These lines determine the depth value at the center pixel of the depth frame. The center pixel is located at coordinates (320, 240).
colorizer = rs.colorizer()
colorized_depth = np.asanyarray(colorizer.colorize(depth_frame).get_data())
A colorizer is created to map the raw depth values to colors, resulting in a colorized depth image.
colorized_depth_flipped = cv2.flip(colorized_depth, 1)
The colorized depth image is horizontally flipped.
rect_size = 20
cv2.rectangle(colorized_depth_flipped, (CENTER_X - rect_size, CENTER_Y - rect_size),
              (CENTER_X + rect_size, CENTER_Y + rect_size), (0, 0, 255), 2)
A red rectangle is drawn around the area where depth measurement is being taken.
text = ""
text_color = (0, 0, 0)
if DISTANCE_MINIMUM <= center_depth < DISTANCE_NEAR:
    text = "Obstacle very close!"
    text_color = (0, 0, 255)  # Red
elif DISTANCE_NEAR <= center_depth < DISTANCE_MEDIUM:
    text = "Obstacle getting closer!"
    text_color = (0, 165, 255)  # Orange
elif DISTANCE_MEDIUM <= center_depth < DISTANCE_FAR:
    text = "Obstacle detected!"
    text_color = (0, 255, 0)  # Green
Text is determined based on the depth value at the center pixel and predefined distance thresholds. Different text and colors are assigned based on the proximity of the obstacle.
cv2.putText(colorized_depth_flipped, text, (10, 30),
            cv2.FONT_HERSHEY_SIMPLEX, 0.6, text_color, 2)
The detected text is overlaid on the image at a specific position, using a specified font, size, and color.
cv2.imshow("Filtered Depth Stream", colorized_depth_flipped)
The final colorized and annotated depth image is displayed in the OpenCV window.
if cv2.waitKey(1) & 0xFF == ord('q'):
    break
The program checks if the ‘q’ key is pressed. If so, it breaks out of the loop, ending the program.
After exiting the loop, the RealSense pipeline is stopped, and the OpenCV windows are closed, terminating the program.
Let’s Start the Mission
Mission : Let’s create a 3-level detector by adjusting the thresholds.
In this mission, the goal is to create a detector by coordinating the four main steps provided in the code.
The purpose of this mission is to identify and categorize objects based on their proximity to the camera.
This can be useful in various applications such as robotics, autonomous vehicles, or surveillance systems where understanding the relative distance of objects is important for decision-making.
Mission Steps:
Step 1: Initialization and Configuration
To begin, initialize the RealSense pipeline and configure the depth stream settings. This step is already provided in the code, so no additional action is needed here.
Step 2: Define Distance Thresholds
Define specific distance thresholds to categorize objects based on their proximity to the camera. Four constants are provided in the code for this purpose:
DISTANCE_MINIMUM = 0.01
This constant represents the minimum distance threshold.
Objects detected closer to the camera than this threshold (less than 0.01 meters away) are considered very close obstacles.
DISTANCE_NEAR = 0.3
This constant represents the “near” distance threshold.
Objects detected between DISTANCE_MINIMUM and DISTANCE_NEAR (between 0.01 and 0.3 meters) are considered obstacles that are relatively close to the camera.
DISTANCE_MEDIUM = 0.6
This constant represents the “medium” distance threshold.
Objects detected between DISTANCE_NEAR and DISTANCE_MEDIUM (between 0.3 and 0.6 meters) are considered obstacles that are getting closer to the camera.
DISTANCE_FAR = 0.9
This constant represents the “far” distance threshold.
Objects detected between DISTANCE_MEDIUM and DISTANCE_FAR (between 0.6 and 0.9 meters) are considered obstacles that have been detected but are farther away from the camera.
Step 3: Continuous Distance Measurement
The code includes a continuous loop that performs real-time distance measurements to a specified point, typically the center of the image. This functionality utilizes the RealSense depth data to measure and categorize objects based on their proximity to the camera.
Step 4: Visualization
The code displays a colorized depth image to provide visualization of distance measurements. It also draws a rectangle around the measurement point and displays text indicating where the object lies compared to a predefined target distance.
Step 5: Cleanup
After exiting the continuous measurement loop, the code ensures proper cleanup by stopping the RealSense pipeline and closing any open OpenCV windows.
Your mission is to adjust the distance threshold to tailor the distance detector to your specific requirements.
Advanced Mission
Now, let’s create our own filtering method by adjusting the thresholds.
DECIMATION_MAGNITUDE = 2:
This parameter controls the magnitude of decimation or downsampling applied to the depth data.
A decimation filter reduces the resolution of the depth data by keeping only every N-th pixel, where N is the decimation magnitude. In this case, a DECIMATION_MAGNITUDE of 2 means that the depth data is reduced to half its original resolution.
Lower values of DECIMATION_MAGNITUDE preserve more details but may have more noise, while higher values reduce noise but lower resolution.
SPATIAL_ALPHA = 0.5:
This parameter controls the strength of spatial filtering and, more specifically, how much the current pixel’s depth value is influenced by neighboring pixels.
Spatial filtering helps smooth out the depth data by averaging nearby depth values. The SPATIAL_ALPHA value determines the weight given to the current pixel’s depth value compared to its neighbors. A higher value (closer to 1) gives more weight to the current pixel, resulting in less smoothing, while a lower value (closer to 0) gives more weight to the neighbors, resulting in more smoothing.
A SPATIAL_ALPHA of 0.5 balances between smoothing and preserving some fine details.
SPATIAL_DELTA = 20:
This parameter controls the spatial filter’s delta or the depth difference threshold used to determine which neighboring pixels are included in the filter’s computation.
Pixels with depth values within the SPATIAL_DELTA threshold of the current pixel’s depth value are considered neighbors and are used in the averaging process. A larger SPATIAL_DELTA includes more distant pixels in the computation, affecting the extent of smoothing.
A SPATIAL_DELTA of 20 means that pixels with depth values within 20 units (e.g., millimeters) of the current pixel’s depth value will be considered neighbors.
TEMPORAL_ALPHA = 0.4:
This parameter controls the strength of temporal filtering, which smooths the depth data over time by averaging the current frame’s depth value with previous frames.
Temporal filtering helps reduce noise and temporal inconsistencies in the depth data. The TEMPORAL_ALPHA value determines how much influence the current frame’s depth value has compared to the previous frames. A higher value (closer to 1) gives more weight to the current frame, resulting in less smoothing, while a lower value (closer to 0) gives more weight to the history of frames, resulting in more smoothing.
A TEMPORAL_ALPHA of 0.4 balances between noise reduction and responsiveness to changes.
TEMPORAL_DELTA = 20:
This parameter controls the temporal filter’s delta or the threshold for considering the difference between the current frame’s depth value and the previous frame’s depth value.
If the depth difference between consecutive frames is within the TEMPORAL_DELTA threshold, the current frame’s depth value is more likely to be included in the temporal filter’s computation. A larger TEMPORAL_DELTA allows for greater depth variations between frames before smoothing is applied.
A TEMPORAL_DELTA of 20 means that if the depth difference between consecutive frames is within 20 units, the current frame’s depth value will be used for smoothing.
These parameters collectively determine how depth data is processed to reduce noise and improve its quality for various computer vision applications, such as object detection or 3D mapping. Adjusting these parameters allows you to fine-tune the trade-off between noise reduction and preserving depth details according to your specific needs.